Showing posts with label web design. Show all posts
Gradient

November 14, 2010

I've moved.

Well, not physically. I finally finished redesigning and updating my online portfolio. In the process, I moved everything over to a new host and (thankfully) said goodbye to my old flash site.

When I started this process, I wasn't planning on a complete redesign, it just evolved into that. It started off smooth but I ran into some significant server issues. But finally, everything is resolved and as a result, I'm planning on returning to my regular posting schedule. Thanks for reading and check back soon!
Gradient

September 18, 2010

Big Site Changes

Just a quick update... I'm undergoing some changes with site redesign and server structure (and domain hosting and other web related stuff) so there are some pretty significant issues with images and links.

I'm hoping to have this resolved as soon as possible. Thanks for checking in!


Update: Still working out some of the kinks, but things are slowly moving into place. Should have an official update soon. I appreciate all the feedback and support. Thanks everyone!
Gradient

November 18, 2009

Typekit Update - FontFont Library Now Offered

After only a few weeks of being acquainted with Typekit and only a couple days after implementing it, the library is already growing. They announced today that the FontFont library will now be offered via Typekit.

This will more than likely be the precursor that opens the floodgates to other type foundries offering their fonts in this easy to use web font system. Right now, FontFont offers about 20 fonts on Typekit and as I said in my last post, this number will only grow. It's only a matter of time before we see type from Sudtipos, Process Type Foundry, and Darden Studio.

You can read the full article on Typekit's blog. If you're not aware of what Typekit is or how to use it, I'll tell you about it here.
Gradient

November 16, 2009

How To Set Up Typekit

All of a sudden, it seems that we're entering a new era in web design. One of the most noticeable changes (as of late) is the use of fonts that designers actually want to use outside the ever-limiting web standard ones. Among various methods, we have Cufón which is an alternative to another experimental flash embedding technique referred to as sIFR. I have experience with sIFR having used it in Willoughby Design's website where we used H&FJ's Whitney. I must say that although sIFR was a great solution, we had a bunch of licensing and security issues which we needed to take into account. With sIFR aside, we now have Typekit.

In a nutshell, according to their site, "Typekit is the easiest way to use real fonts on the web." To date and with the experience that I have with some of the aforementioned methods, this claim is very accurate.


I first heard about Typekit a few months ago before they opened it to the public and I wasn't really sure what it was at first. They officially opened up shop a little more than a week ago and I'm glad I've finally had some time to explore it.

1. Setting Up

Once I logged in, I simply had to enter the domain name that I wanted to use a "kit" in. I had to then copy and paste a short line of unique javascript code into the HTML head tags in my website. Note: The following code will be unique to your information.

<script src='http://use.typekit.com/FileName.js' type='text/javascript'/>
<script type='text/javascript'>try{Typekit.load();}catch(e){}</script>

2. I'm Done Already?

At first it seemed like I was, but not quite. After finishing our first step, Typekit says, "You're all set. Now go find some fonts!" Damn... that was pretty easy.

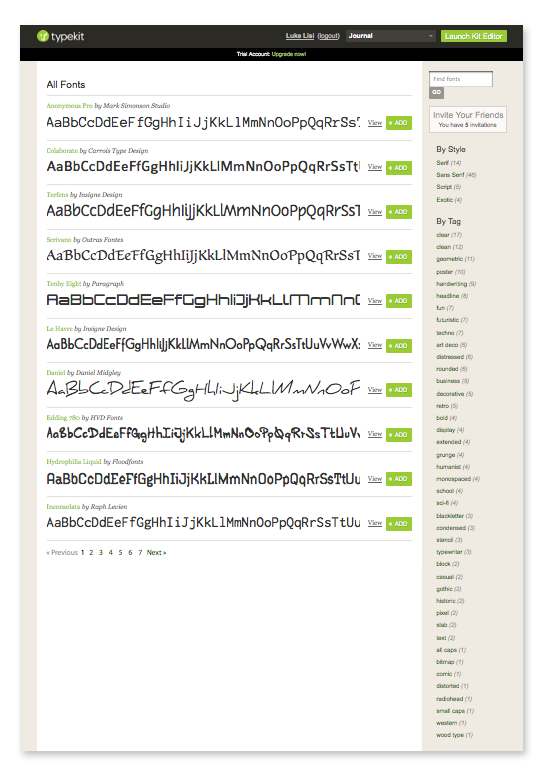
After proceeding, I was taken to a page of close to 100 fonts to choose from. It's a very respectable list and I imagine that the library will only grow. Very organized, you can search categories such as serif, sans serifs, to distressed and pixel. After searching, I selected a couple of my favorites. I have the basic free service which allows me to use 2 fonts on 1 domain which is fine for my purposes. You can upgrade (and pay) for more fonts across more domains.


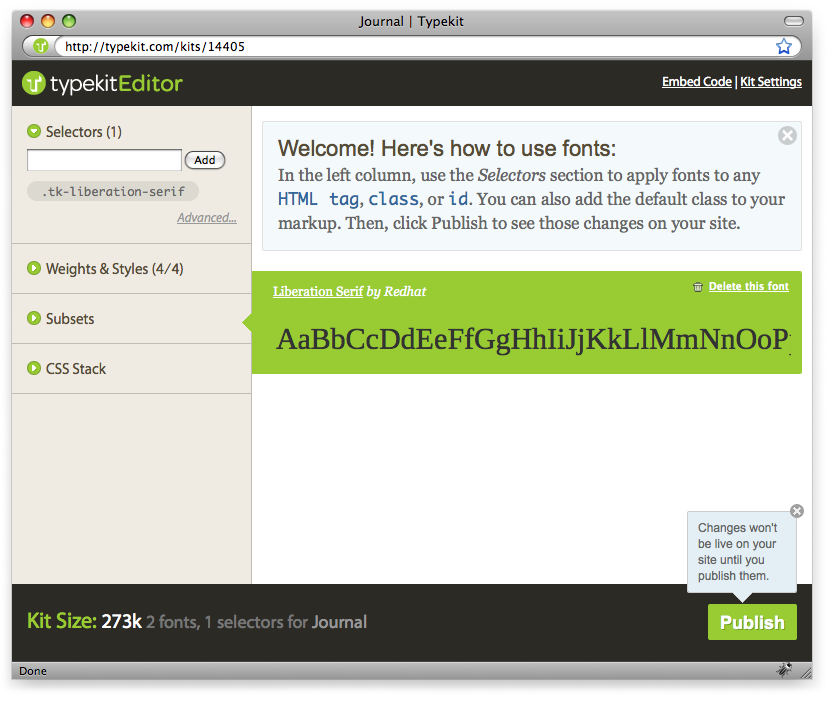
Once I selected the font of choice (called Liberation Serif and now used in my headers), I opened the "Typekit Editor".


3. Adjust Your CSS

All that was left was for me to do was add the name of the font to my CSS [example code shown below]:

h1 {
font-family: "liberation-serif-1","liberation-serif-2",serif;
}

The process is literally that easy. If I wasn't writing this article while doing it, it would have taken me no more than 10 minutes to get a working font on my site. And although the code adds a little badge in the corner, it's not intrusive and doesn't really bother me. If I were to upgrade my account, the badge would not be required and I'm sure if I was really savvy, I could hide it. In conclusion, I am very impressed with the selection and ease of Typekit... I look forward to new features it has to offer.

Wanna Add Typekit To Your Website?

If you're interested in joining the Typekit community, I have a limited number of invites that I'd be happy to share. Just post a comment with your thoughts and a way for me to contact you and I'll pass one along. Also, if you end up implementing Typekit on your site, let me know as I'm curious to see your use... Enjoy and thanks for reading. I look forward to hearing from everyone!
Gradient

April 23, 2009

Blogger's "Reaction" Feature

I don't think it's new, but I just found Blogger's "Reaction" widget. I've been interested in adding something similar to Facebook's "Like" feature and what do you know? Blogger was way ahead of me.


How To Add

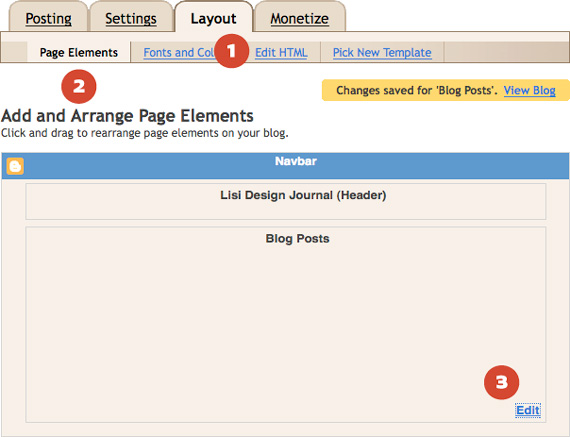
In Blogger, go to (1) Layout (2) Page Elements and in your "Blog Posts" module click (3) Edit.


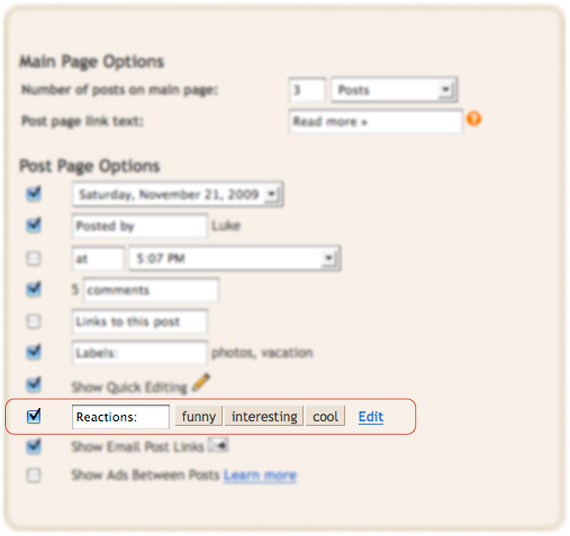
By default, Blogger gives you 3 categories: Funny, Interesting, Cool. You can add more or remove some if you want. In my case, I only wanted one; a "Like" button.


If I kept everything as the default settings, it would give me something that looks like the first image shown in this post. Not quite a "Like" button, so I had to edit the code myself. To do so, I made only one category simply labeled "Like" and after saving all my progress, I moved into the "Edit HTML" module. I clicked "Expand Widget Templates" to show all the code. This line of code was made from the settings I had just set up:
<span class='reaction-buttons'><b:if cond='data:top.showReactions'><table border='0' cellpadding='0' width='100%'><tr><td valign='center'><span class='reactions-label'><data:top.reactionsLabel/></span></td>
<td><iframe allowtransparency='true' class='reactions-iframe' expr:src='data:post.reactionsUrl' frameborder='0' name='reactions' scrolling='no'/></td></tr></table></b:if></span>

It's a little messy and it had some things in there that I didn't want. The following line is the code that renders the word "Reactions" (or whatever you decide to name your categories). In my scenario, I didn't want it shown at all, so I just deleted the line:

<span class='reactions-label'><data:top.reactionsLabel/></span>

Some of the other code was formatting for tables. Since I only have 1 box, I don't need to worry about how multiple boxes will look. With that said, I cleaned the code even more. This is the final code that simulates the "Like" feature I was going for:

&lt;span class=&#39;reaction-buttons&#39;&gt;&lt;b:if cond=&#39;data:top.showReactions&#39;&gt;
&lt;iframe allowtransparency=&#39;true&#39; class=&#39;reactions-iframe&#39; expr:src=&#39;data:post.reactionsUrl&#39; name=&#39;reactions&#39; scrolling=&#39;no&#39;/&gt;&lt;/b:if&gt;&lt;/span&gt;